What is an Explanatory Invoice?
Invoice for your service business isn’t complicated, but ignoring important information can lead to disputes or late payments, and make you look unprofessional to clients. On the other hand, learning how to write the right invoice can build customer trust and encourage them to pay in full, on time. In this case, you can create an explanatory invoice.
It doesn’t matter if you are starting from an invoice template, blank document, or invoice software. We’ll cover what to include, how to write an invoice, and best practices that will save you time and money. An explanatory invoice is a type of invoice that has detail of transactions that mostly has personal notes.
How to Create an Explanatory Invoice Step by Step?
In case you are ready to start writing your own explanatory invoice, you can start following the steps:
-
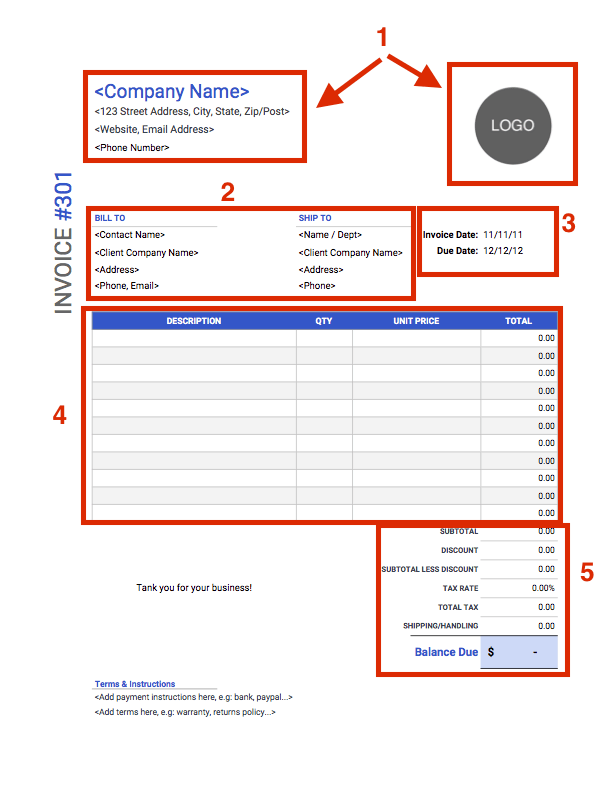
Step #1: Create a Professional Layout
Your invoice should look professional. This builds trust with your clients and ensures that they will pay you on time. Your business name should be in large font at the top of the page, either cantered or left. If you put your logo on your invoice, you are three times more likely to get paid!
Next, make sure to include the word “Invoice” near the top of the page. This step may seem simple, but it’s important for your customers to know it’s the invoice they received, so they can give them the attention they deserve.
-
Step #2: Include Company and Client Information
Include your business address, telephone number and email directly below your business name in a smaller font. Clients should be able to easily reach you if they have any questions, plus they can refer you to a friend if they are happy with the service. Next, include the name and address of the recipient (your client) to make sure it reaches the right person. Include the service address if it is different from their mailing address.
-
Step #3: Add Invoice Number, Invoice Date, and Due Date
The three most important numbers on the invoice, after the amount due, are the invoice number, invoice date, and due date. Invoice numbers keep your records organized, especially at tax time. Dates are a bold yet polite way of explaining when a customer should pay. Add these near the top and make them visible.
-
Step #4: Write Each Line Item with Service Description
Here is the problem. Your customers want to pay you as long as they understand what they’re paying you for. Just look at what this landscaping business owner has to say about including line items
-
Step #5: Additional Line Items for Total Money Payable
Finally, add up all the subtotals and write the total amount owed on a separate line, in bold or highlighted font so that they stand out. Using an invoice template or good software will calculate these fields for you automatically. If you have taxes or discounts to apply, include them just above the total amount owed so it’s clear to customers what they have to pay.
-
Step #6: Include Simple Payment Terms and Payment Options
This step is essential for good customer service and avoiding disputes. It’s always good to go over these terms in person before the job is done, but be sure to include them on the invoice as an added reminder. They are including payment due date, late payment fine, and money back guarantee or service guarantee. Importantly, pay attention to exactly how customers can pay you, either in cash, by check, or by online ePayments.
-
Step #7: Add Your Personal Notes
The final step is often overlooked, but it can be a great way to leave a positive final impression, ask for feedback, or even get a referral. Include a final personal message to clients thanking them for their business. You can add any additional information, such as an upcoming seasonal offer, your referral program, or a review request. This is the last thing they’ll look at before paying, and is a great way to make them feel comfortable choosing your business.